
Introduction
Imagine a golden-brown crust, giving way to a cloud-like interior that practically melts in your mouth. That, my friends, is the magic of a perfectly crafted buttermilk biscuit. These aren’t just any biscuits; these are Golden Buttermilk Biscuits, so fluffy and utterly delicious, they’ll become an instant staple in your kitchen. Whether gracing your breakfast table, accompanying a hearty stew, or simply enjoyed on their own with a smear of jam, these biscuits promise a taste of pure comfort and culinary delight.
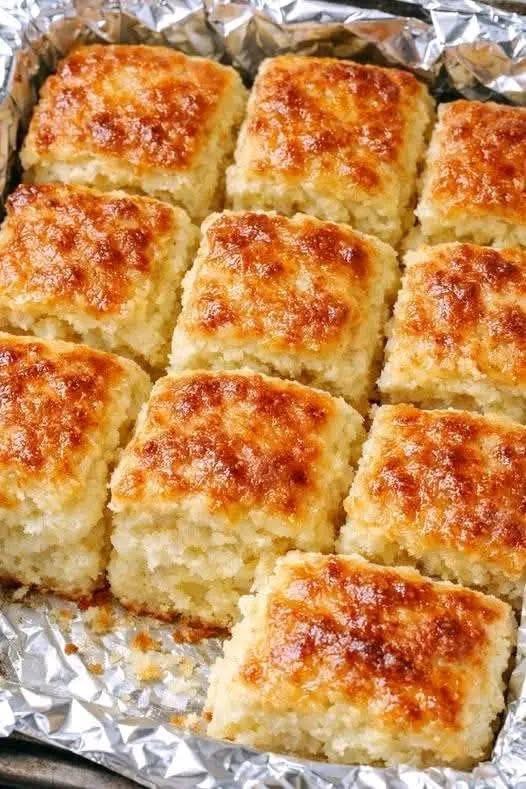
What makes these biscuits truly special lies in the harmonious interplay of simple ingredients and a few key techniques. The star of the show, buttermilk, isn’t just a liquid; it’s a tenderizing agent that imparts a subtle tang and an incredibly soft crumb. Combined with cold butter, which creates pockets of steam as it bakes, these biscuits rise to glorious heights, boasting countless flaky layers. The golden hue isn’t just for show; it’s the result of a high baking temperature and perhaps a touch of melted butter or an egg wash, locking in moisture and adding another layer of flavor and visual appeal.
Forget dry, dense, or flavorless biscuits. This recipe is designed to deliver consistent, show-stopping results every time. We’ll walk you through each step, from selecting the right ingredients to mastering the gentle art of dough handling, ensuring your biscuits are not just good, but truly exceptional. Get ready to impress your family and friends with a batch of these golden beauties that are surprisingly easy to achieve with our expert tips and tricks.
Nutritional Information
Per serving (approximate values):
- Calories: 280
- Protein: 6g
- Carbohydrates: 35g
- Fat: 13g
- Fiber: 1g
- Sodium: 450mg
Ingredients
- 2 ½ cups all-purpose flour, plus more for dusting
- 1 tablespoon baking powder
- ½ teaspoon baking soda
- 1 teaspoon granulated sugar
- ½ teaspoon salt
- ¾ cup (1 ½ sticks) unsalted butter, very cold and cut into ½-inch cubes
- 1 cup cold buttermilk, plus 1-2 tablespoons for brushing (optional)
- 2 tablespoons melted unsalted butter, for brushing tops (optional, as an alternative to buttermilk brush)
Instructions
- Preheat your oven to 425°F (220°C). Line a baking sheet with parchment paper or lightly grease it.
- In a large bowl, whisk together the flour, baking powder, baking soda, sugar, and salt until well combined.
- Add the cold, cubed butter to the dry ingredients. Using a pastry blender, your fingertips, or a food processor, cut the butter into the flour mixture until it resembles coarse crumbs with some pea-sized pieces of butter remaining. The key here is to work quickly to keep the butter as cold as possible.
- Make a well in the center of the flour and butter mixture. Pour in the cold buttermilk.
- Using a fork or a rubber spatula, gently mix the ingredients until just combined. The dough will be shaggy and sticky, but avoid overmixing. Overmixing develops gluten, which leads to tough biscuits.
- Turn the dough out onto a lightly floured surface. Gently pat the dough into a rough rectangle, about ¾ to 1 inch thick. Do not knead the dough excessively.
- To create flaky layers, perform a few “folds.” Fold one side of the dough over to the center, then fold the other side over that, like folding a letter. Gently pat it down again to about ¾ to 1 inch thick. Repeat this folding process one or two more times. This helps create those desirable layers without overworking the dough.
- Using a 2 to 2 ½-inch biscuit cutter (or a sharp knife for square biscuits), cut out the biscuits. Dip the cutter in flour between cuts to prevent sticking. Press straight down without twisting the cutter, as twisting seals the edges and prevents a good rise.
- Carefully transfer the cut biscuits to the prepared baking sheet. For higher-rising biscuits, place them relatively close together, about ½ inch apart. For crispier edges, space them further apart.
- If desired, brush the tops of the biscuits with a little extra buttermilk or melted butter. This helps achieve that beautiful golden-brown crust.
- Bake for 12-18 minutes, or until the tops are golden brown and the biscuits have risen significantly. The exact baking time will depend on your oven and the size of your biscuits.
- Once baked, remove the biscuits from the oven. If you didn’t brush them before baking, you can brush them with melted butter immediately after removing them from the oven for extra flavor and shine.
- Serve warm and enjoy!
Cooking Tips and Variations
For truly exceptional biscuits, remember that cold ingredients are your best friend. Keep your butter and buttermilk in the refrigerator until the very last moment. You can even chill your flour in the freezer for 15-20 minutes before starting, especially on a warm day. When cutting in the butter, work quickly to prevent it from melting. If the butter starts to get too warm, pop the bowl into the freezer for a few minutes to chill it down.
Do not, under any circumstances, overmix the dough. The moment the wet and dry ingredients are just combined and there are no dry flour pockets, stop mixing. A shaggy, slightly sticky dough is exactly what you want. Overmixing develops gluten, which is great for bread, but terrible for tender biscuits. The less you handle the dough, the more tender your biscuits will be.
When cutting out your biscuits, use a sharp cutter and press straight down. Avoid twisting the cutter as you press, as this can seal the edges of the biscuit, preventing it from rising properly and creating beautiful layers. If you don’t have a biscuit cutter, a sharp knife can be used to cut the dough into squares, which is just as delicious and often results in more uniform pieces with less re-rolling of scraps.
Baking at a high temperature is crucial for a good rise. The initial burst of heat helps the butter create steam, pushing the layers apart. Keep a close eye on them during the last few minutes of baking to prevent burning. If your biscuits are browning too quickly on top, you can loosely tent them with aluminum foil.
For a sweeter biscuit, you can increase the sugar to 2 tablespoons. For a savory twist, try adding 1/4 cup of shredded cheddar cheese, chives, or dried herbs like rosemary or thyme to the dry ingredients. These variations are fantastic for accompanying soups or stews. You can also make drop biscuits by simply scooping portions of the dough onto the baking sheet instead of cutting them, which is even faster and creates a more rustic look.
Storage and Reheating
Freshly baked biscuits are always best enjoyed immediately, warm from the oven. However, if you have leftovers, they can be stored at room temperature in an airtight container for up to 2 days. For longer storage, you can refrigerate them for up to 5 days, or freeze them for up to 2-3 months.
To reheat refrigerated or frozen biscuits, preheat your oven to 300°F (150°C). Place the biscuits on a baking sheet and heat for 5-10 minutes for refrigerated biscuits, or 15-20 minutes for frozen biscuits, until warmed through and slightly crisp on the outside. You can also quickly warm them in a microwave for 15-30 seconds, but be aware that this can sometimes make them a little chewier. For the best texture, oven reheating is highly recommended.
Frequently Asked Questions
Why are my biscuits tough?
Tough biscuits are almost always a result of overworking the dough. When you overmix, you develop the gluten in the flour too much, leading to a chewy, dense texture rather than a light and fluffy one. Handle the dough as little as possible, mixing only until the ingredients are just combined and then performing gentle folds.
Can I substitute regular milk for buttermilk?
While you can make a “sour milk” substitute by adding 1 tablespoon of lemon juice or white vinegar to 1 cup of regular milk and letting it sit for 5-10 minutes, it won’t yield quite the same results as true buttermilk. Buttermilk has a unique consistency and acidity that contributes significantly to the tenderness, flavor, and rise of the biscuits. For the best outcome, it’s highly recommended to use real buttermilk.
My biscuits didn’t rise much, what went wrong?
Several factors can contribute to biscuits not rising. First, ensure your baking powder and baking soda are fresh and active. Old leavening agents lose their potency. Second, make sure your butter and buttermilk are very cold; this creates steam pockets for lift. Third, avoid twisting the biscuit cutter, as this seals the edges and inhibits rising. Lastly, don’t overmix the dough, as this can prevent proper expansion.
Can I prepare the dough ahead of time?
Yes, you can! You can cut out the biscuits and place them on a parchment-lined baking sheet, then cover and refrigerate for up to 24 hours before baking. You can also freeze the unbaked biscuits. Arrange them on a baking sheet and freeze until solid, then transfer them to an airtight freezer bag. When ready to bake, place the frozen biscuits directly on a baking sheet (no need to thaw) and bake at the same temperature, adding a few extra minutes to the baking time until golden brown.