
Introduction
There’s a unique magic in turning a few humble ingredients into something as comforting and delicious as a fresh loaf of bread. From the moment you mix flour and water to the incredible aroma that fills your kitchen as it bakes, bread making is a journey of transformation. It’s a primal act, connecting us to generations past, and a deeply satisfying one that yields a reward far greater than the sum of its parts.
This isn’t just about baking; it’s about experiencing the alchemy of yeast, the development of gluten, and the sheer joy of creating something truly from scratch. The title, “From Dough to Delicious: The Bread Making Transformation,” perfectly encapsulates this journey. We’ll guide you through every step, demystifying the process and empowering you to pull a warm, golden, and utterly irresistible loaf from your own oven. Prepare to be amazed by what you can create with your own two hands.
Forget store-bought loaves; once you’ve tasted the rich flavor and tender crumb of homemade bread, there’s no going back. This recipe is designed to be accessible for beginners while still offering the depth and character that experienced bakers crave. So, roll up your sleeves, gather your ingredients, and let’s embark on this delightful transformation together.
Nutritional Information
Per serving (approximate values):
- Calories: 150
- Protein: 5g
- Carbohydrates: 28g
- Fat: 2g
- Fiber: 1g
- Sodium: 250mg
Ingredients
- 3 cups (360g) all-purpose flour, plus more for dusting
- 1 teaspoon (3g) active dry yeast
- 1 teaspoon (6g) granulated sugar or honey
- 1 teaspoon (6g) fine sea salt
- 1 cup (240ml) warm water (105-115°F / 40-46°C)
- 1 tablespoon (15ml) olive oil, plus extra for greasing
Instructions
- Activate the Yeast: In a large mixing bowl, combine the warm water and sugar (or honey). Sprinkle the active dry yeast over the top. Let it sit undisturbed for 5-10 minutes. The mixture should become foamy and bubbly, indicating that the yeast is active. If it doesn’t foam, your water might have been too hot or too cold, or your yeast may be old; discard and start again with fresh yeast and properly tempered water.
- Combine Dry Ingredients: To the foamy yeast mixture, add the salt and 1 cup of the flour. Stir well with a wooden spoon or spatula until combined.
- Add Remaining Flour: Gradually add the remaining 2 cups of flour, about half a cup at a time, mixing after each addition. The dough will start to come together and become shaggy.
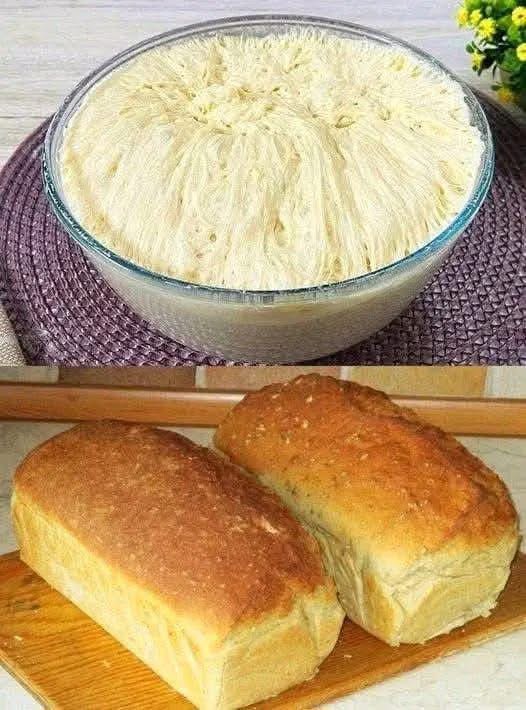
- Knead the Dough: Once all the flour is added and the dough is too stiff to stir, turn it out onto a lightly floured surface. Knead the dough for 8-10 minutes. The dough should transform from a shaggy, sticky mass into a smooth, elastic, and supple ball. To knead, push the dough away from you with the heel of your hand, fold it back over itself, rotate it a quarter turn, and repeat. If the dough is too sticky, lightly flour your hands and the surface, but avoid adding too much extra flour, as this can make the bread dense.
- First Rise (Proofing): Lightly grease a clean large bowl with olive oil. Place the kneaded dough ball into the bowl, turning it once to coat the entire surface with oil. This prevents it from drying out. Cover the bowl tightly with plastic wrap or a clean kitchen towel. Place the bowl in a warm, draft-free place for 1 to 1.5 hours, or until the dough has doubled in size. A slightly warm oven (turned off) or a sunny spot on your counter works well.
- Punch Down and Shape: Once the dough has doubled, gently punch it down to release the air. Turn the dough out onto a lightly floured surface. Gently shape the dough into your desired loaf shape. For a classic loaf, gently flatten the dough into a rectangle, then roll it tightly from one long side to the other, pinching the seam closed. Tuck the ends under to create a neat loaf.
- Second Rise: Lightly grease a 9×5 inch loaf pan (or baking sheet if shaping free-form). Place the shaped dough into the prepared pan. Cover loosely with plastic wrap or a clean kitchen towel. Let it rise again in a warm, draft-free place for another 30-45 minutes, or until it has nearly doubled in size and looks puffy.
- Preheat Oven: About 15-20 minutes before the end of the second rise, preheat your oven to 375°F (190°C).
- Bake the Bread: Place the risen loaf pan into the preheated oven. Bake for 30-35 minutes, or until the crust is golden brown and the internal temperature of the bread reaches 200-210°F (93-99°C) when measured with an instant-read thermometer. If you tap the bottom of the loaf, it should sound hollow.
- Cool: Once baked, immediately remove the bread from the loaf pan and transfer it to a wire rack to cool completely. Cooling on a rack prevents the bottom from becoming soggy. Resist the urge to slice into it while hot; it needs to cool to allow the internal structure to set properly.
Cooking Tips and Variations
For the best results, always use fresh yeast. Stale yeast will not activate properly, leading to a dense, unrisen loaf. Store your active dry yeast in an airtight container in the refrigerator or freezer to prolong its freshness. When measuring flour, spoon it into your measuring cup and then level it off with a straight edge; scooping directly from the bag can compact the flour, leading to too much flour and a dry dough. The warmth of the water is critical for yeast activation; too hot will kill the yeast, too cold won’t activate it. An instant-read thermometer is your best friend here.
Kneading is perhaps the most crucial step for developing gluten, which gives bread its structure and chew. Don’t be afraid to really work the dough. If you have a stand mixer with a dough hook, it can do the kneading for you, typically for 6-8 minutes on medium-low speed. The dough is properly kneaded when it passes the windowpane test: tear off a small piece of dough and gently stretch it. If you can stretch it thin enough to see light through it without it tearing, your gluten is well developed. If it tears easily, continue kneading for a few more minutes.
Creating a warm, draft-free environment for proofing is essential. If your kitchen is cool, you can place the covered bowl or loaf pan in a turned-off oven with the oven light on, which provides a gentle warmth. Alternatively, place it near a sunny window or in a slightly warmed microwave (don’t turn it on, just use it as an insulated space). Don’t rush the rising process; it’s better for the dough to rise slowly and fully than to be forced quickly.
To achieve a beautiful golden-brown crust, you can brush the top of the loaf with a little milk or an egg wash (one egg beaten with a tablespoon of water) just before baking. For a chewier crust, you can place a shallow pan of hot water on the bottom rack of your oven during the first 10-15 minutes of baking to create steam. This helps the crust remain pliable longer, allowing for a better rise, before it crisps up. Dusting the top with a little flour before baking also gives it a rustic look.
For variations, consider adding herbs like rosemary or dried oregano to the dough during the mixing stage for an aromatic loaf. You can also incorporate seeds such as poppy seeds, sesame seeds, or sunflower seeds for added texture and flavor. For a slightly sweeter bread, increase the sugar to 2 tablespoons and consider adding a handful of raisins or dried cranberries. For a whole wheat version, substitute up to half of the all-purpose flour with whole wheat flour, but be aware that whole wheat flour absorbs more liquid, so you might need to add a splash more water, and the dough will be denser.
Another popular variation is to make garlic bread. After the bread has cooled, slice it horizontally, spread with a mixture of softened butter, minced garlic, and fresh parsley, then broil until golden and bubbly. For sandwiches, a slightly richer dough with a tablespoon of butter or milk powder added to the dry ingredients can create a softer crumb. Don’t be afraid to experiment once you’ve mastered the basic technique; bread making is an art as much as a science, and personal touches make it even more rewarding.
Storage and Reheating
Once your homemade bread has cooled completely, it’s best enjoyed within 2-3 days. To maintain its freshness, store the bread at room temperature in an airtight container, a bread box, or a sealed plastic bag. Avoid storing it in the refrigerator, as refrigeration can cause the bread to stale more quickly. If you live in a humid climate, storing it in a breathable cloth bag inside a bread box can help prevent mold while still allowing some air circulation.
For longer storage, homemade bread freezes exceptionally well. Once completely cool, you can slice the entire loaf and then place the slices in a freezer-safe bag or wrap the whole loaf tightly in plastic wrap followed by aluminum foil. Frozen bread will maintain its quality for up to 3 months. When you’re ready to enjoy it, simply remove the desired number of slices or the whole loaf from the freezer and let it thaw at room temperature. Sliced bread can also be popped directly into a toaster from frozen.
To reheat a whole loaf or larger pieces, preheat your oven to 350°F (175°C). Wrap the bread loosely in aluminum foil and bake for 10-15 minutes, or until warmed through. The foil helps to steam the bread, preventing it from drying out. For a crisper crust, you can remove the foil for the last 5 minutes of reheating. Individual slices can be quickly warmed in a toaster, toaster oven, or a dry skillet over medium heat until lightly toasted and fragrant.
Frequently Asked Questions
Why didn’t my bread rise?
The most common reasons for bread not rising are inactive yeast, water that was too hot or too cold when activating the yeast, or a cold environment during proofing. Ensure your yeast is fresh and your water is between 105-115°F (40-46°C). Also, give your dough enough time and a warm, draft-free spot to rise properly. Under-kneading can also contribute to a poor rise, as gluten development is crucial for trapping the gases produced by the yeast.
How do I know if I’ve kneaded the dough enough?
Properly kneaded dough will be smooth, elastic, and no longer sticky. It should spring back when gently poked with a finger. A good test is the “windowpane test”: take a small piece of dough and gently stretch it between your fingers. If you can stretch it thin enough to see light through it without it tearing, the gluten is well developed. If it tears easily, continue kneading for a few more minutes.
Can I make this bread ahead of time?
Yes, you can prepare the dough and let it have its first rise in the refrigerator overnight. This is called a cold fermentation and can actually enhance the flavor of the bread. After the first rise, gently punch down the dough, shape it, and proceed with the second rise and baking as usual. Just be aware that the second rise might take a little longer if the dough is cold from the fridge.
What if my bread is too dense or too crumbly?
If your bread is dense, it could be due to not enough kneading, inactive yeast, not enough rising time, or too much flour. A dense crumb often means the gluten structure wasn’t strong enough to hold the air, or the yeast didn’t produce enough gas. If it’s crumbly, it might be overbaked, or there might have been too much flour added during mixing or kneading, making the dough too dry. Always measure flour accurately and try to avoid adding excessive amounts during kneading.